Whenever I’m redecorating a room, I love choosing the accessories. Adding in a fresh rug is a great finishing touch that transforms the entire space.
But once the room is updated with a brand new accent rug, what should you do with your old one? If you’re not quite ready to throw it away, you can breathe new life into it instead. With a little love, it can be the perfect addition to any room.
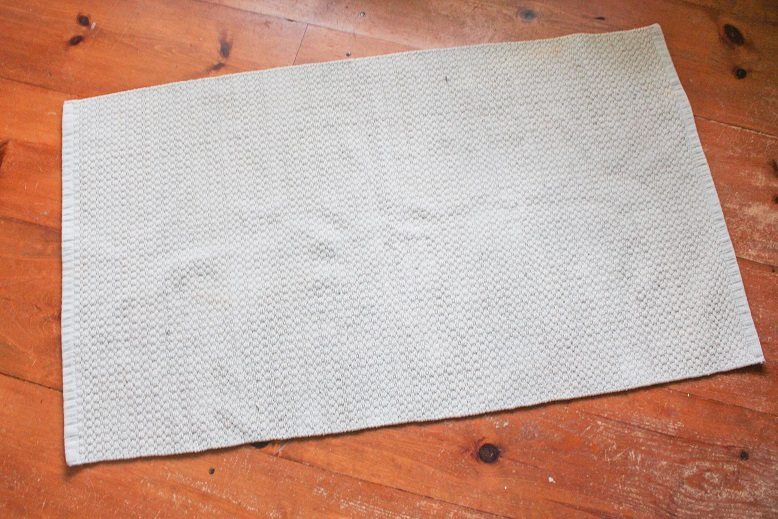
When I replaced my area rug, I knew I could transform the old one with a simple project. The rug measured 29 x 49 inches—a decent size for a small room, sitting area or next to the bed.
Although the original color had faded to a very pale, washed-out blue, the rug itself was in great condition. To update the rug, I added fabric binding around the edge.
Step One: Pick Your Fabric
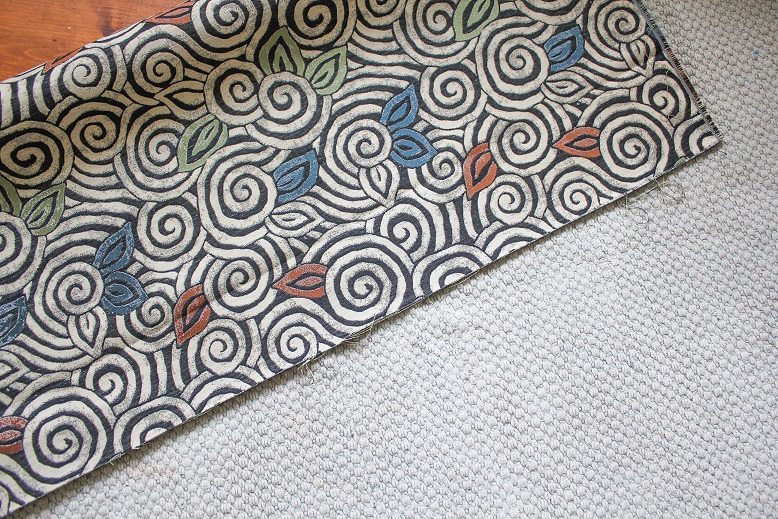
I found a silver swirl pattern with blue, green and rust leaves at the local fabric store. This pattern and color complement the rug perfectly. When choosing material for your rug, look for an upholstery fabric. It needs to be woven, not knit, and have some weight to it.
Step Two: Measure and Cut
You want the binding to be wide enough to make a visual impact. Three inches was ideal for this size rug. To make the binding easier to work with, cut your strips of fabric on the bias. This means marking your cutting lines at a 45-degree angle from the salvage edge. Cut strips seven inches wide (three-inch binding for the front, three-inch binding for the back, plus a half-inch seam allowance for both sides).

Step Three: Fold and Pin
Fold the binding strips in half and press with a hot iron. Then, fold a half-inch of fabric under each raw edge and press flat. You want a nice, crisp edge. Pin the binding all the way around the rug.

Step Four: Cut the Excess
The easiest way to finish the corners is to cut the side bindings even with the edge of the rug, then overlap the top and bottom bindings over the side bindings. Cut off the excess fabric and fold the raw edges in.

Step Five: Finish with a Seam
Hand sew the binding to the rug using a heavy duty thread all the way around. Do the same on the back side, so the rug can be reversible. For the sewing-challenged individual, glue the binding to the rug with a hot glue gun. Note that if you glue the fabric, the rug will not be washable, so you won’t want to use it in a high traffic area of the house.

The final result is a pretty rug that matches your decor. Use it to spruce up a sitting area, or try layering it over your new rug for a bohemian look!

Interior designer Merri Cvetan heads up MEC Design Studio in Wisconsin. Merri’s design expertise includes extensive knowledge of floor accessories, including area rugs. She writes her tips for The Home Depot. To research area rugs available on the Home Depot website, including styles that Merri discusses, you can visit here.


Join the Conversation